Jul 17 2007
teacher’s gift part 2
Hahahaha! Kinder and Second Grade keep me busier than I anticipated! So I finally have time this evening to share with you the teacher’s gift for Perrin’s First Grade teacher.
It started with this card:
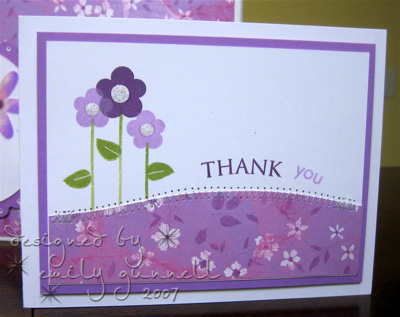
I originally wanted to make her a set of Thank You cards since I noticed that she sent several out during the school year. I wanted to do some simple sewing and wanted to use purple. I had Perrin ask her what her favorite color was and she gave two: purple and red. While I didn’t have any bold purple and red paper, I did have this one that has purple and some hints of red.
I then pulled out my PaperTrey sets Green Thumb and Paper Tray. I came up with this simple design and shared it with my HYEN friends at Splitcoaststampers for some feedback. One idea that I was glad to have shared with me was from Andee, she suggested making a set of cards with different sentiments and changing them up a bit as opposed to making 12 of the same design. So with that, I went on to complete the three Thank You cards and came up with these additional three designs:
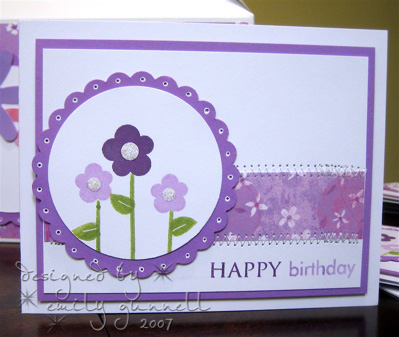
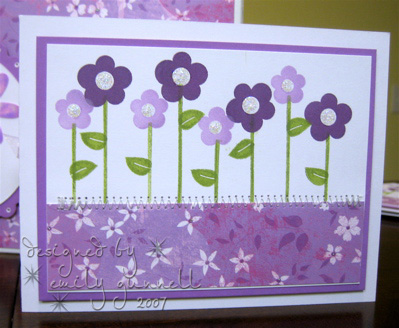
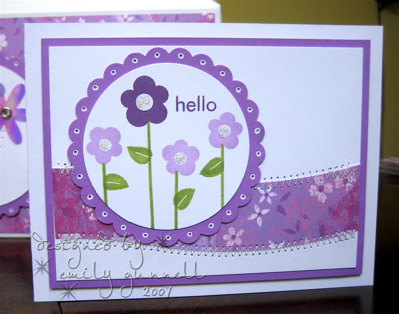
I was able to make them look like a complete set by using the same patterned paper, stamp sets, colors, and sewing accents on each card. The paper I used is Poisies Glitter Print by DCWV. Jenn posted that she had found this awesome patterned paper with glitter already on them at her local Michaels, so I headed over to mine and was able to find several different designs put out by this company — all with glitter already on them! This particular design matched really well with Orchid Opulence, a VERY neglected purple by me. I used the white cardstock from PaperTrey for the card bases and white layers.
Each panel is lifted up with mounting tape on the white card base. The inks I used were VersaMagic colors Purple Hydrangea, Spring Pansy and Tea Leaves. You can find these inks at eclectic Paperie, I love to use them with my acrylic stamps! Stickles was applied to each flower center for some extra sparkle!
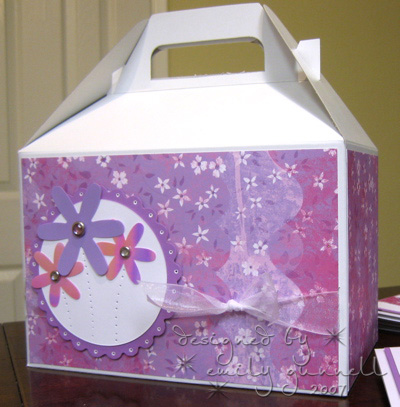
To complete the gift, I bought a cute pencil holder from Gold Canyon and put two matching big clippies with some Hershey sticks in a cello bag inside it. The hardest part was figuring out how to package everything together, and by now it was getting pretty late so I went into “easy mode”. I remembered that I had a bunch of gable boxes and tested the size. The cards and goodies fit, so I started to plot how to decorate the box. It has been a VERY long time since I decorated one of these! It was pretty sad to see me stare at it for way too long. I finally decided to just cover each side with the decorative paper and make a focal image.
Fortunately, I had some of these fun large sequence flowers from Queen & Co. that matched the paper just enough to fudge it. Since I had done two cards with scalloped circles, I decided to do the same for the front of the box. The stems of the flowers were pierced and the flowers were attached with some bling brads.
And in the post below you can see the completed set. I packaged the cards with envelopes in these awesome boxes (scroll down) from PaperTrey. They are a really good buy at $6.00 for a pack of 10 boxes. It says you can fit about 12 in one box, but since each card had a lifted panel I was only able to fit six with envelopes in each box. My only regret is that I ran out of time to stamp on the envelopes. Jami had suggested that to me to finish off the set and at whatever-o’clock in the morning it was, I would have rather sat on a tack then drag my stamps back out. So next time I will budget my time better to make matching envelopes! (maybe) Lesson learned on my part!
Okay, that’s all for this post! To anyone who read the whole thing, you deserve some chocolate! Hehehe!
12 responses so far


Oh Emily that is a wonderful set for the teacher!! I agree with making a set of different cards that coordinate, and having different sentiments on them!
Cute box to pkg them in!! I have about 10 pkgs of those Papertray card boxes, they are SO nice to use for gifting cards!!!
Great cards – actually, the whole gift is fabulous!
Since you’re so good at these things maybe you could help me out? My daughter will have a male teacher for the first time this fall. I’ve given her other teachers some note cards at the beginning of the year and my dd will be expecting me to make some again… but for a male teacher??? Help! Any suggestions would be greatly appreciated!!
That is one lucky teacher! I am sure she with love all your creativity and thoughtfulness. The colors for the honor society I was in in college was green & purple, so I love the combo. Thanks for the inspiration!
What adorable cards and great teacher gift, Emily! The purple and white just pops — great job, I love the stitching!
These cards and the box are awesome! They certainly don’t look like they were made at the last minute! Off to get my chocolate…I read the whole thing!
These turned out adorable! Love them!
Pixie, these absolutly perfect! I am glad my advice helped and I think that the designs are just so pretty! I really like that they are all different and coordinate so well. You did a great job!
So I read the whole thing, where is my chocolate, huh? 😉
Em – wow! These turned out really fantastic! I never use Orchid Opulence, but it sure is cute here – way to go!
Wow these card and that box is great, love the color combo.
Beautiful work!! 🙂
How pretty! What a great gift!
You make really nice things! Love it all!